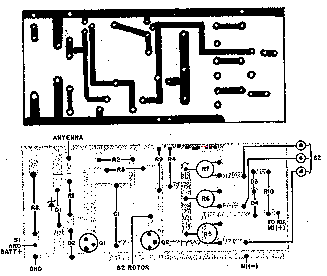
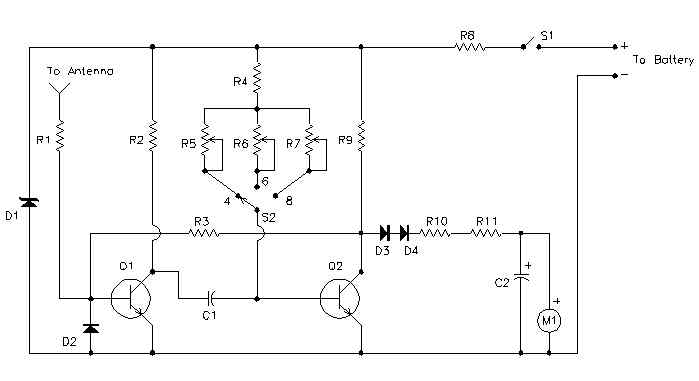
Thursday, August 12, 2010

How To Test Coil / Inductor

How To Test AC/DC Voltage

Saturday, February 13, 2010

CONSTANT CURRENT SOURCE


This circuit provides a constant current to the LED. The LED can be
replaced by any other component and the current through it will depend on
the value of R2. Suppose R2 is 560R. When 1mA flows through R2,
0.56v will develop across this resistor and begin to turn on the BC547.
This will rob the base of BD 679 with turn-on voltage and the transistor
turns off slightly. If the supply voltage increases, this will try to increase the
current through the circuit. If the current tries to increase, the voltage
across R2 increases and the BD 679 turns off more and the additional
voltage appears across the BD 679.
If R2 is 56R, the current through the circuit will be 10mA. If R2 is 5R6, the
current through the circuit will be 100mA - although you cannot pass

100mA through a LED without damaging it.

LED DETECTS LIGHT

LED DETECTS LIGHTAll LEDs give off light of a particular colour but some LEDs are also
able to detect light. Obviously they are not as good as a device that
has been specially made to detect light; such as solar cell, photocell,
photo resistor, light dependent resistor, photo transistor, photo diode
and other photo sensitive devices.
A green LED will detect light and a high-bright red LED will respond
about 100 times better than a green LED, but the LED in this position
in the circuit is classified as very high impedance and it requires a
considerable amount of amplification to turn the detection into a
worthwhile current-source.

All other LEDs respond very poorly and are not worth trying.
The accompanying circuit amplifies the output of the LED and enables
it to be used for a number of applications.
The LED only responds when the light enters the end of the LED and

this makes it ideal for solar trackers and any time there is a large
difference between the dark and light conditions. It will not detect the

light in a room unless the lamp is very close.


DANCING FLOWER
This circuit was taken from a
dancing flower.
A motor at the base of the
flower had a shaft up the stem
and when the microphone
detected music, the bent shaft
made the flower wiggle and
move.
The circuit will respond to a

whistle, music or noise.

Revolutionary Electronics through Carbon Nanotube Nano-Electro- Mechanical Switches

Supporting/Contributing Agencies: National Reconnaissance Office
The need for a very high speed, radiation hardened, and low power logic technology exists to
support national security space and terrestrial systems. However, as we scale down in feature
size to achieve higher levels of performance, issues with power, radiation sensitivity, and
reliability arise that make the use of conventional < src="file:///C:/Users/ENG%7E1.KAR/AppData/Local/Temp/moz-screenshot.jpg" alt="">


1
Figure 1a. Schematic
of a CNT fabric “switch” Figure 1b. SEM of an as-built CNT switch

Thursday, February 4, 2010

Auto Wireless Tachometer

schematic

This is the schematic of the Tach


board layout


This is the parts placement and printed circuit pattern of the Tach


Parts


Part
Total Qty.
Description
Substitutions
C110.47uF Capacitor
C2147uF Electrolytic Capacitor
D118V 1W Zener Diode
D2, D3, D431N914 Diode
M11200uA Meter
Q1, Q222N3391A Transistor
R1, R2, R931K 1/2 W Resistor
R3147K 1/2 W Resistor
R4110K 1/2 W Resistor
R5, R6225K Trim Pot
R7110K Trim Pot
R81200 Ohm 2 W Resistor
R10115K 1/2 W Resistor
R1112.2K 1/2 W Resistor
S11SPST Togglae Switch
S21Three Position Single Pole Rotary Switch
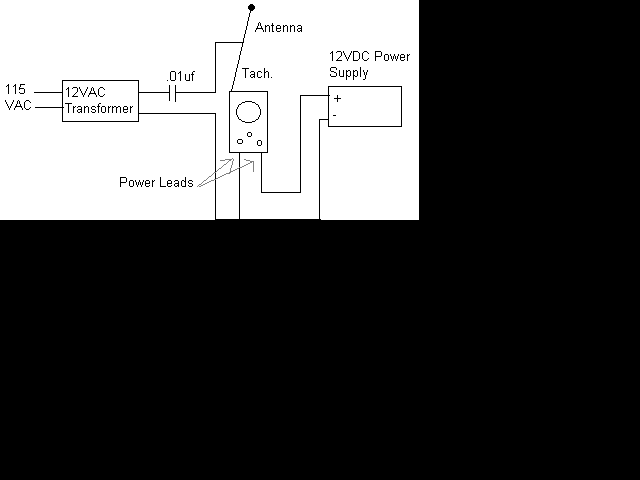
MISC1Telescoping Radio Antenna, Enclosure, Power Cable and Battery Connector

Notes

  1. Calibrate the unit as folows:
    1. Set up this circuit:

      This is the setup for calibrating the Tach

    2. Turn on the Tach and allow a few minutes for temperature stabilization.
    3. Set S2 to 4 cylinders and adjust R5 for a meter indication of 180 (1800 rpm).
    4. Set S2 to 6 cylinders and adjust R6 for a meter indication of 120 (1200 rpm).
    5. Set S2 to 8 cylinders and adjust R7 for a meter indication of 90 (900 rpm).
  2. To use the Tach, turn it on and let it sit for one minute to allow for temperature stabilization. Extend the antenna, select the right number of cylinders and hold the unit over the engine. If the reading is erratic or the needle jumps around, move the antenna closer to the ignition coil or spark plug wires.
  3. The unit draws power from the car battery. If it is connected backwards, it will not work, but it won't be damaged.